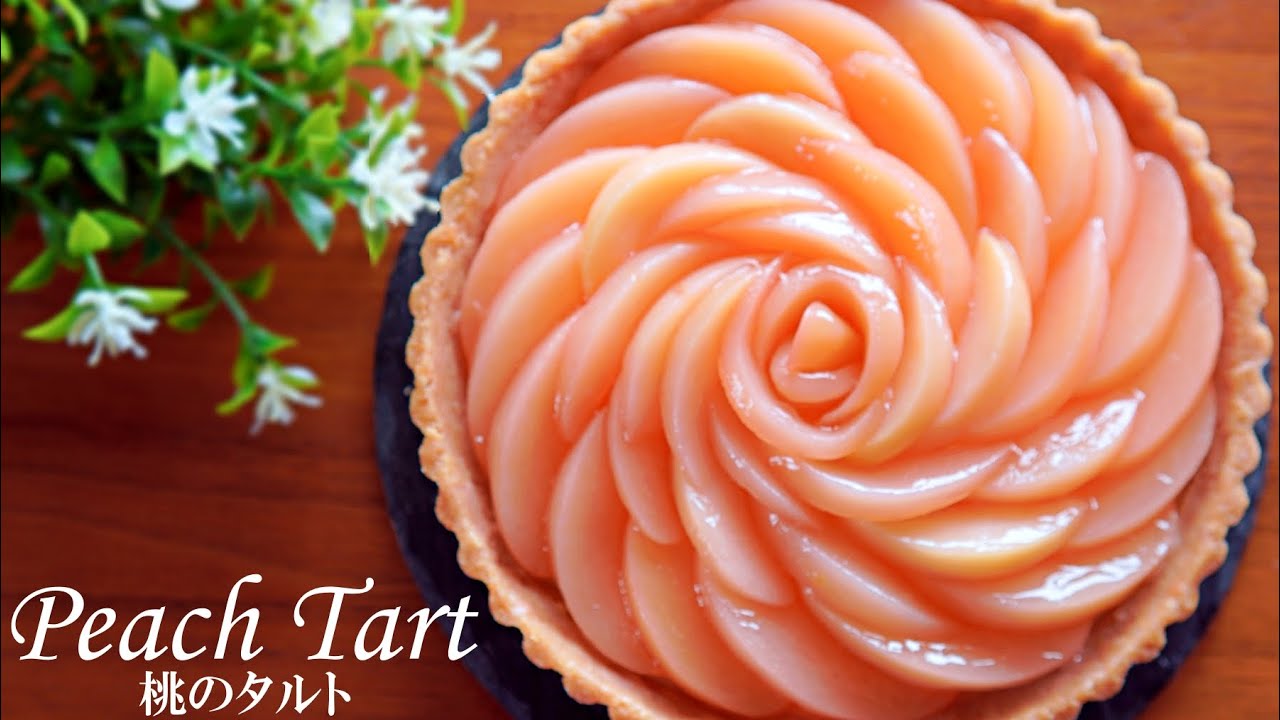
桃の缶詰を使って、混ぜて冷やすだけで、とても簡単なのに美味しく出来るので、ぜひお試しください😊
ご視聴ありがとうございます😊 チャネル登録、いいね していただけると嬉しいです✨✨
葉もれ日Kitchen
https://www.youtube.com/channel/UCli3KG5jfJpWLyDt2cUEupg?sub_confirmation=1
ベルマーク🔔を押すと毎回通知が届くようになります。
動画のコメントをいただけるととても嬉しいです♪
【材料】 18cm 底取れ型 ※ダイソーで購入できます
<タルト生地>
ビスケット 140g (チョイス 2箱 9袋)
無塩バター 50g
牛乳 大さじ1
<カスタードクリーム>
牛乳 200ml
卵 1個
グラニュー糖 50g
薄力粉 20g
バニラエッセンス 適量
<ナパージュ>
桃の缶詰のシロップ 大さじ3
粉ゼラチン 2g
<その他>
桃の缶詰
食紅
【作り方】
1. ビスケットをフリーザーバッグに入れて、麺棒で細かく砕きます。
※細かく砕いた方が綺麗に仕上がります。
2. バターを耐熱容器に入れて600Wのレンジで40秒加熱します。
3. 砕いたビスケットをボウルに入れ、溶かしたバターと牛乳を加えてよく混ぜ合わせます。
4. タルト型にビスケットを敷き詰め、冷蔵庫で1時間ほど冷やして固めます。
※タルトは崩れ易いので、型にギュッと押し付けて、敷き詰めてください。
5. 耐熱ボウルに卵を入れて溶き、グラニュー糖を加えてよく混ぜます。
6. 振るった薄力粉を加えて混ぜ、牛乳を加えてよく混ぜます。
7. ふんわりラップをし、500Wのレンジで2分加熱します。
8. 加熱後、泡だて器でよく混ぜ、再度500Wのレンジで2分30秒加熱します。
9. よく混ぜて、バニラエッセンスを数滴入れて混ぜ合わせます。
※ダマができてしまったら裏ごししてください。
※固めがお好みの場合は更にレンジで10秒ずつ加熱して固さを調整してみてください。
※レンジで加熱してもクリームが緩い場合は、お鍋に移して加熱してください。
10. カスタードクリームを冷やします。(30分~1時間)
11. 桃を缶詰から取り出し、薄くスライスします。
12. スライスした桃と缶詰のシロップを容器に入れ、食紅を少々加えます。
13. 時々桃を裏返して、色付けします。
14. 桃が薄く色付いたら、桃を取り出しキッチンペーパーの上にのせ、水気を取ります。
15. シロップはナパージュに使うので、大さじ3を耐熱容器に入れ、ゼラチンを入れてふやかします。
16. カスタードクリームが冷めたら、冷蔵庫で冷やしておいたタルト型に流し入れます。
17. カットした桃をカスタードクリームの上に飾ります。
18. ナパージュ用のシロップを500Wのレンジで20秒加熱します。
19. タルト型に並べた桃にナパージュを塗って冷蔵庫で冷やしたら完成です。
Ingredients: 18 cm removable bottom pan (You can buy it at Daiso)
<tart dough>
140g biscuit
50g unsalted butter
1tbsp milk
<custard cream>
200ml milk
1 egg
50g granulated sugar
20g cake flour
vanilla extract
<glaze>
3tbsp syrup from canned peaches
2g powdered gelatin
<others>
canned peaches
red food coloring
Instructions:
1. Put the biscuit in a bowl and crush it finely with the bottom of a glass.
Note: The finer you crush it, the cleaner it will be.
2. Put the butter in a heat-resistant container and heat it in a 600W microwave oven for 40 seconds.
3. Add the melted butter and milk to the bowl with the crushed biscuits and mix well.
4. Place the biscuits in a tart mold and refrigerate for 1 hour to firm up.
Note: The tart is easy to crumble, so press it tightly into the mold and spread it out.
5. Beat the eggs in a heatproof bowl, add the granulated sugar and mix well.
6. Add the shaken cake flour and mix, then add the milk and mix well.
7. Wrap it gently and heat it in a 500W microwave for 2 minutes.
8. After heating, mix well with a whisk and heat again in a 500W microwave for two and a half minutes.
9. Mix well and add a few drops of vanilla extract and mix.
Note: If you have a lump, please strain.
Note: If you prefer a firmer texture, heat it in the microwave for 10 seconds each to adjust the firmness.
10. Chill the custard cream. (30minutes – 1hour)
11. Remove the peach from the can and slice it thinly.
12. Put sliced peaches and canned syrup in a container and add a little red food coloring.
13. Turn the peaches over occasionally to color them.
14. When the peaches are lightly colored, take them out and place them on paper towel to drain them.
15. Since syrup is used for glaze, put 3 tbsp in a heat-resistant container and add gelatin to make it soak.
16. When the custard cream has cooled, pour it into a tart mold that has been chilled in the refrigerator.
17. Cut the peaches and decorate them on top of the custard cream.
18. Heat the syrup for glaze in a microwave at 500W for 20 seconds.
19. Apply glaze to the peaches arranged in a tart and cool in the refrigerator and you’re done.
【レシピ本】
『我が家の3時のキッチンから』
2022年1月26日(水)発売
全国の書店、ネット書店にて発売中!
■Amazon
【instagram】
https://www.instagram.com/hamorebi_kitchen
【Twitter】
Tweets by HamorebiKitchen
【LINE】
https://lin.ee/EHSCwlX
【音楽】 Epidemic Sound
https://www.epidemicsound.com
#桃のタルト #桃のレシピ #オーブン不要 #レンジレシピ #バレンタイン #ホワイトデー #母の日 #おうちカフェ #夏スイーツ #葉もれ日キッチン #asmr #asmrfood #asmrsounds #asmrvideo #父の日 #夏 #桃 #ひんやりスイーツ


コメントを残す